Using Win10 Core and Azure IoT Services with Raspberry Pi2

I recently hosted an IoT booth at a Microsoft Internal conference and showcased a demo of using Win 10 Core RTM build on a Raspberry Pi2 (also referred as Pi from here on) and connecting it to Microsoft Azure IoT Services.


I wanted to show a very simple scenario to highlight how easy it is to develop and deploy Windows 10 Universal apps for IoT Devices and connect them to Azure IoT Services. The Scenario in my case was generating metrics of visitors coming to the booth. The application collects details about the organization the visitors belong to and uses Azure IoT Services to process the data and generate reports showing metrics and distribution of visitors. The below snapshot shows the output of how the report looks like:


There were many queries around the code sample and how to setup the device for connecting to Azure IoT Services. In this blog series, I will talk about setting up your device for Windows 10 Core (RTM build) and then communicating with Azure IoT Services to process the data.

This will be a multi-part blog series and will include the following parts:

Part 1: Setting up things

Part 2: Developing a Windows Universal app

Part 3: Processing event streams using Azure Stream Analytics

Part 4: Creating a Dashboard using Microsoft Power BI

Part 5: Using SSL with Raspberry Pi

The Windows 10 Universal app sample code is available here (For reference purpose only):
https://github.com/niksacmsft/IoT.Samples.Universal.EventIngest


Using Win10 Core and Azure IoT Services with Raspberry Pi2 – Part 1

This is Part 1 of the multi -part blog series Using Win10 Core and Azure IoT Services with Raspberry Pi2. For an introduction of the scenario, please refer here.

Setting up Things

In this blog post, we will set up our device to work with Win 10 RTM build.

The first thing is to make sure you have all the modules and devices required for the sample. The following specifies the pre-requisites required for the sample to work:

Pre-requisites

  1. Hardware:
    1. Raspberry Pi 2 Model B
    2. A Monitor with HDMI support: I used this for the demo.

      Note that not all screens are compatible with Win10 Core. For hardware specification for Win 10 Core please refer here.

    3. A USB connected Mouse
    4. Original Raspberry Pi WiFi adapter: (Only when using Wi-Fi)

      NOTE: No other WiFi dongle will work as of today, I specify a workaround below in case you don’t have the dongle.

    5. A Power Supply: I used the Gomadic AA battery operated power stick and it worked well with RPi2 and Win10 Core. You don’t need this if you have a power outlet available or if you just want to boot out of your laptop USB ports. The Pi typically requires around 1.2 A to run most applications.
    6. A Bluetooth Adapter (Optional)– Only if you want to connect a Bluetooth device such as a mouse (NOTE: As of today only this adapter works with Win10 Core)
    7. A USB keyboard: In case you want to enter the network credentials when connecting to Wi-Fi.
  2. Software
    1. Windows 10 RTM image (10240). Check out the release notes for known issues here.
    2. A Windows 10 PC with Visual Studio 2015 RTM: For development purposes only. The code samples for this blog is in C# but you can also use other languages.

Alright! So now we have all the devices, let’s get started with our Win 10 setup. In the section, we will install the Win10 Core image on to our Pi, connect it to a network and ensure that we are able to run a Universal app remotely connecting to our Pi:

Installing Windows 10 Core on RPi2

The Windows team has a great page here on getting started with the installation of Windows 10 Core on a Pi. Use this to get your device and PC ready for development.

Boot up your Pi

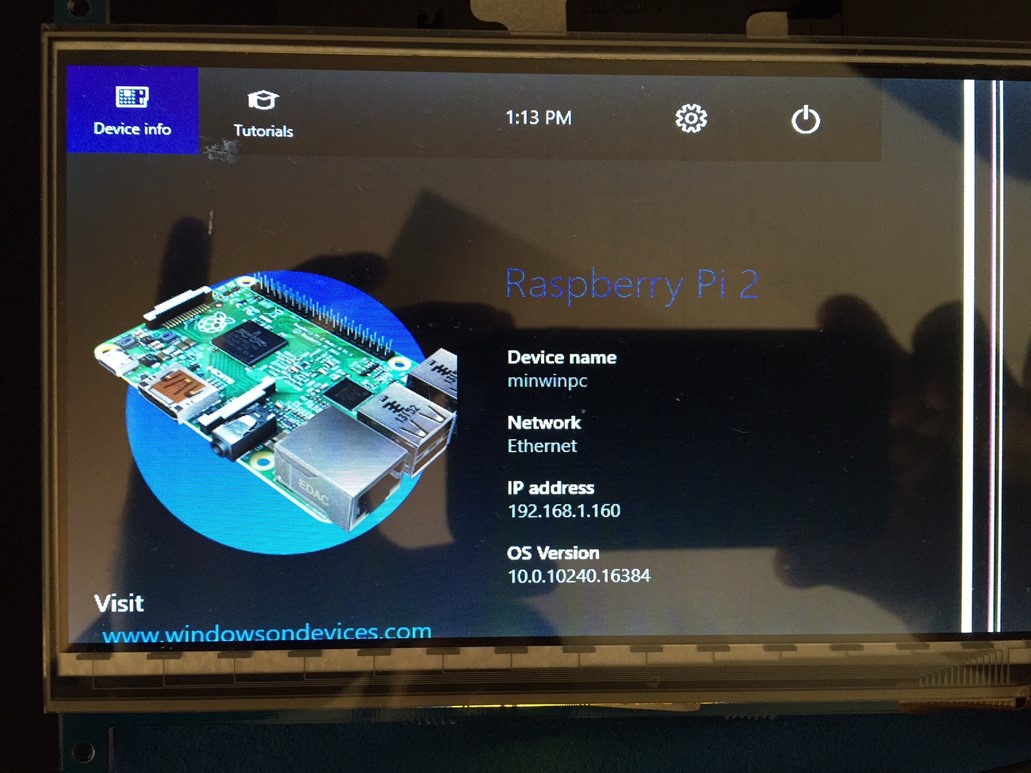
Hook the RPi2 to the power supply. If all works OK, you should see a similar screen. Note that if you do not have the Pi connected to a network the Network and IP Address slots will be empty. We discuss connectivity in the next section.


Connecting Pi to a Network

To enable connectivity with Azure IoT Services, the Pi must be connected to the internet. There are multiple ways you can achieve this:

  1. Option 1: Using the Ethernet port: The simplest ways to connect your Pi to a network is to hook it to your router directly using an Ethernet cable. Note that if your Pi was already running you may have to restart to get the IP address for the device.
  2. Option 2: Original Raspberry Pi WiFi dongle: The current Win 10 Core image has been tested on the Original Raspberry Pi dongle and ONLY works with this Wi-Fi adapter.

    If you have any other adapter that you got using a development kit like the Canakit it will not work as of today.

    Connecting to the dongle is fairly straightforward:

  • Click the settings icon on the top right hand of the home screen.
  • On the Device Settings screen, Select Network & Wi-Fi and select the network you want to connect. Enter credentials and you are done!


  1. Option 3: Using a Wi-Fi to Ethernet adapter: I hope the team will provide support for other WiFi dongle’s soon since the Pi dongle is only available from a couple of locations within the US. However, if you still want to use WiFi as an option for your device, you can use a WiFi to Ethernet adapter such as the NetGear Universal N300. I used this for my demo and it worked very well with very few disconnects or reconnections.

NOTE: Make sure both your Win 10 development PC and the Pi are connected to the same network or have network sharing enabled. We will do a remote deployment from Visual Studio so both device should be available to communicate with each other.

Testing remote connectivity

You can test the connectivity of the device using PowerShell or using the Windows IoT Core Watcher desktop app that is installed along with the Win 10 IoT Core setup.

However, I prefer using the Win 10 Core device web page that provides a clean web interface and allows you to remotely view and update* the device configuration. The device web page is courtesy a hosted web server that comes along with the Win10 Core installation.

The URL for the web page is http://<YourDeviceIPAddress>:8080/default.htm

Clicking on this page should take you to a screen such as below. As you can see, here you can select Apps to run, Manage Device, view performance metrics, setup network connectivity etc.


We are now ready to develop of Windows Universal App and deploy it to the Pi. In Part 2 of this series, we will develop a Windows Universal App that connect to Event Hub over an AMQP connection for sending user selections.

Using Win10 Core and Azure IoT Services with Raspberry Pi2 – Part 2

This is Part 2 of the multi-part blog series Using Win10 Core and Azure IoT Services with Raspberry Pi2. For an introduction of the scenario, please refer here.

Developing an Azure IoT Service Connected Windows Universal app

In Part 1 of this blog series, we covered setting up the Pi and related modules for building and deploying our Windows universal app. In this blog post we will develop our app and then remotely deploy it the Pi device we configured.

If you do not have Visual Studio configured for Windows 10 IoT Core, please refer here.

There are two modes in which you can develop a Windows 10 IoT app, Headed and Headless.

The difference really is that the former supports a UI and the latter is mostly used for background services. For this scenario, we will create a headed app.

Note that since Windows supports the concept of Universal apps, you do not need specialized templates for created Headed or Headless app for IoT devices. The beauty of Universal apps is that the same code can run on any Windows supported device.  The only specialized template available for Windows IoT Core  in Visual Studio is for Background apps. 

Instead of giving a step by step of how the Universal App is created, I provide the key steps that you can use to configure your solution. The entire code for the sample is available on my Github repo here: https://github.com/niksacmsft/IoT.Samples.Universal.EventIngest

  • Create a new Project in Visual Studio using Windows -> Universal -> Blank App (Universal) template.
    • Add the IoT Extension to the project using Reference -> Extensions


  • Add another project to the solution using the Windows -> Universal -> Class Library (Universal Windows) template. We will use this project to add helper and common classes.
    • Add the IoT Extension to this project using Reference -> Extensions -> Windows IoT Extensions for the UWP.
    • Add the following Nuget packages to the project
      • AMQPNetLite: We use this for connecting to EventHub over AMQP
      • Newtonsoft.Json: We use this for serialization and de-serialization of our JSON documents.
  • Build your solution to make sure all things are working OK. When building the package, Nuget will attempt to restore the UWP packages and any other configured packages.
  • Create an Event Hub: For this blog post, I will assume that you know how to create an Event Hub. In case you are new to Event Hubs I have a previous blog entry which talks about Event Hubs, you can refer to it here.
  • Connecting to Event Hub programmatically

    For my sample, I wanted to create a simple library that allows me to connect to Event Hubs on either HTTPS or AMQP protocol. I extended the bits from http://connectthedots.io sample and created a re-usable asynchronous wrapper that I call as ConnectionManager that allows connection to Event Hubs over either of the protocols. I plan to add more protocol to this wrapper in future.

    • For HTTPS it uses a REST API call the Event Hub API and
    • For the AMQP connection it uses AMQPNetLite client library.

    Below is an excerpt of the ConnectionManager.cs class:

<code>
public async Task<bool> SendEvent(Event eventStream)
 {
 eventStream.Timecreated = DateTime.UtcNow.ToString("mm:dd:yyyy hh:mm:ss");
 return await SendMessage(eventStream.ToJson());
 }
 private async Task<bool> SendMessage(string message)
 {
 var protocol = Protocol;
 switch (protocol)
 {
 case Protocol.Amqp:
 return await SendMessageAmqp(message);
 case Protocol.Https:
 return await SendMessageHttps(message);
 default:
 return false;
 }
 }
 
 private async Task<bool> SendMessageHttps(string message)
 {
 if (!this._eventHubConnectionInitialized) return false;
 try
 {
 var content = new HttpStringContent(message, Windows.Storage.Streams.UnicodeEncoding.Utf8, "application/json");
 var postResult = await _httpClient.PostAsync(_uri, content);
 
 if (postResult.IsSuccessStatusCode)
 {
 Debug.WriteLine("Message Sent: {0}", content);
 }
 else
 {
 Debug.WriteLine("Failed sending message: {0}", postResult.ReasonPhrase);
 }
 return true;
 }
 catch (Exception e)
 {
 Debug.WriteLine("Exception when sending message:" + e.Message);
 return false;
 }
 }
 private async Task<bool> SendMessageAmqp(string message)
 {
 //TODO: figure out if AMQP.NET lite support async method calls
 // construct message
 var messageValue = Encoding.UTF8.GetBytes(message);
 
 // here, AMQP supports 3 types of body, here we use Data.
 var formattedMessage = new Message { BodySection = new Data { Binary = messageValue } };
 _sender.Send(formattedMessage, null, null); // Send the message 
 // _connection.Close(); // close connection
 return true;
 }
</code>
  • Configuring Event Hub connection strings

    Instead of hard coding my event hub and related connection strings, I use a JSON file for persisting this information. The JSON is packaged as part of the IoT.Samples.Universal.EventIngest project and deployed to the device when the application is installed.

    • Create a new folder under Assets folder called Settings
    • Create a new settings.json file under this folder.

    The JSON file itself is fairly simple and looks like this:

<code>
{
 "settings": {
 "servicebusnamespace": "your service bus namespace",
 "eventhubname": "your event hub name",
 "keyname": "the SAS key for sending messages to event hub",
 "keyvalue": "the SAS key value for sending messages to event hub"
 }
}
</code>
  • Configuring the UI for the Universal App

    The UI for my Universal App is very basic, the idea for me was to demonstrate how to connect a device to an Azure backend and generate reports out of it. I did not put a lot of effort in cosmetic and UI aspects.

    I used a FlipView control to show the different departments and leverage the Tapped event to invoke a call my ConnectionManager for sending the selected option to Event Hub.

    Additionally a TextBlock control is used to display success and exceptions.

<code>
private async void flipView_Tapped(object sender, TappedRoutedEventArgs e)
 {
 try
 {
 // try to cast source as content presenter
 var content = e.OriginalSource as ContentPresenter;
 if (content == null) return;
 // Send data to Event Hub
 var eventData = new Event
 {
 Id = "iotboothdevice",
 Timecreated = DateTime.UtcNow.ToString("mm:dd:yyyy hh:mm"),
 Value = content.Content.ToString()
 };
 var result = await _connectionManager.SendEvent(eventData); // send message over event hub
 if (!result) return;
 var message = string.Format("Last Successful Message sent at: {0}", DateTime.UtcNow);
 textBlock.Text = message;
 InitializeFlipView();
 }
 catch (Exception ex)
 {
 textBlock.Text = ex.Message;
 }
 }
</code>

Deploy and Test the app on the PI

Visual Studio 2015
provides seamless integration for deploying, testing and debugging Universal apps on supported devices. To deploy the app on your Pi devices, there are few changes we need to make to our project configuration:

  • Right click and select Properties for the IoT.Samples.Universal.EventIngest project.
  • In the debug tab, select Target device as Remote Machine and enter the IP Address of your Pi device, do not check the Authentication check box.


  • Select ARM as the architecture (this is required for Pi since it is ARM based), the Remote Machine option will be the only option available in the debug now.
  • Now if you run the solution, Visual Studio will attempt to connect to your Pi device and initiate the deployment of the solution. During the deployment it will package the necessary files and dependencies, install any requirement .NET framework version. Finally, it will select the Universal App as the running app on the device. You should see a screen similar to the below:


  • Our app is now running, if you click on any of the FlipView control items, a call will be sent to EventHub to register the selection. The UI will be updated with the last successful message update.


In Part 3 of this blog series, we will leverage Stream Analytics to make sense of the data coming in from the device.