In Part 1 of this multi-part series blog, we talked about EventHubs and the design patterns that enable it to perform at high throughputs. In this blog post we will create use EventHub for collecting data from a publisher, we will also create a Consumer that can receive the published events.
Problem Scenario
Our problem situation is a fictitious automotive company Contoso Motor Works (CMW). CMW has built their next generation Telemetry system to collect frequent data streams from the vehicles. The data will be used for performing preventive maintenance and near real time analytics for example to provide notifications to the driver in case the engine oil goes below the level. Contoso has chosen EventHub and Stream Analytics to achieve the anticipated scale for their North America vehicle rollout.
The high-level design looks something like this:
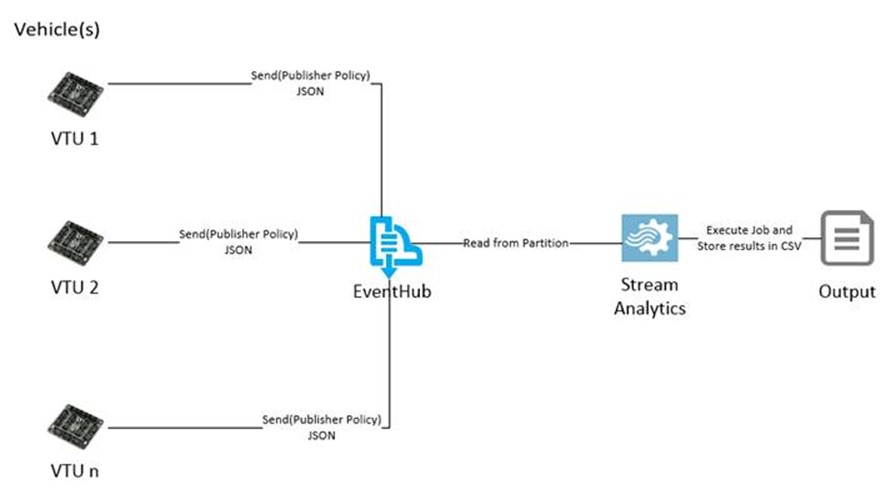
Note that since this is a simplified scenario we only output the results in a CSV. In a real world scenario, you can do more powerful stuff such push the results into another EventHub and have a Consumer that sends push notifications using Notification Hubs, etc. I will cover some of those in the next section of this series.
Creating our Data Model
We need to represent Telemetry data from the Vehicle that will be sent as the Event datastream, the following represents a simplistic model for our fictitious scenario:
public class VehicleStream : Entity |
{
public int TirePressure { get; set; } // Ignore using psi, using a standard int
public int FuelGaugeLevel { get; set; }
public int EngineOilLevel { get; set; }
public int OdoMeterReading { get; set; }
public bool VTUStatus { get; set; }
}
The VehicleStream model inherits from a common base Entity type which I use as a base class for all models:
| public abstract class Entity |
{
public int Id { get; set; }
public DateTime TimeStamp { get; set; }
public string CreatedAt { get; set; }
}
Creating an EventHub
EventHub like other Azure Service Bus entities can be creating either using the Management portal, the REST API or using the Service Bus NuGet package. In the scenario, we will create our EventHub using the .NET Service Bus NuGet package.
To know more about creating EventHub entities using the API refer here. This is particularly useful when you want to create EventHub entities as part of a deployment PowerShell or workflow.
The following code allows you to create an EventHub in an existing Service Bus namespace:
| private static async Task<bool> EnsureEventHub() |
{
//// Create an Event Hub in an existing namespace
// Requires Manage Permission so we will skip for now and create through management portal
Console.WriteLine(“Creating EventHub …”);
// Get the SB settings
var settings = new NamespaceManagerSettings
{
TokenProvider =
TokenProvider
.CreateSharedAccessSignatureTokenProvider
(
“RootManageSharedAccessKey”,
“<your manage token>”)
};
var serviceBusUri = ServiceBusEnvironment.CreateServiceUri(“sb”, “<your SB namespace>”, string.Empty);
var manager = new Microsoft.ServiceBus.NamespaceManager(serviceBusUri, settings);
// Create settings for event hub
var description = new EventHubDescription(“<your event hub name>”) { PartitionCount = 32, MessageRetentionInDays = 1 };
var result = await manager.CreateEventHubIfNotExistsAsync(description);
if (result.Status != EntityStatus.Active)
{
Console.WriteLine(“Could not create EventHub”);
return true;
}
return true;
}
If you have created other Service Bus entities such Topics, Queue, the above code will look very familiar. We create a NameSpace manager and provide the appropriate credentials. You will also need to ensure that you have a connection string has Manage permissions on the Service Bus namespace. (this is typically the RootManageSharedAccessKey).
We now define settings for our EventHub. The EventHubDescription type allows you to configure your EventHub such as defining the Partition count and retention interval, etc. If you do not want to configure these, use the overload that only requires the name as input and uses default values for the EventHub.
Note that I use the CreateEventHubIfNotExistsAsync asynchronous operation above for creating EventHub. All methods exposed by the Service Bus API for EventHub include an overload for Async operations, the synchronous operations are also available but it is recommended to use the Async await model to improve overall performance.
Great! Our Event hub is created, now let’s set permission for access.
Defining Security policies
EventHub provide an SAS (Shared Access Signature) model for granular control over permissions, again this is similar to existing Service Bus entities. Security is of utmost important in the Internet Of Things world, having a granular control over permissions greatly simplifies access management for devices.
It is recommended that you always define unique permissions for your publisher and consumer with only a limited access required by the entity. The following permissions can be defined:
public enum AccessRights
{
[EnumMember] Manage,
[EnumMember] Send,
[EnumMember] Listen,
}
So, for example, your publishers can always be configured with a Send Rule whereas the consumer can be created using a Listen rule. Use the Manage permission rules only for administrative applications like your PowerShell deployment scripts, etc.
The following code can be used to create permissions for the EventHub we just created:
|
public static async Task<bool> ConfigurePermissions(string eventhubName) { // configure a publisher permission on the event hub var eventHubPublisherSettings = new EventHubDescription(eventhubName) { PartitionCount = 32 }; const string EventHubPublisherKey = “publisher”; string eventHubPublisherKeyValue = SharedAccessAuthorizationRule.GenerateRandomKey(); var eventHubSendRule = new SharedAccessAuthorizationRule(EventHubPublisherKey, eventHubPublisherKeyValue, new[] { AccessRights.Send }); eventHubPublisherSettings.Authorization.Add(eventHubSendRule); // configure a consumer permission on the event hub const string EventHubConsumerKey = “consumer”; var eventHubConsumerKeyValue = SharedAccessAuthorizationRule.GenerateRandomKey(); var eventHubListenRule = new SharedAccessAuthorizationRule(EventHubConsumerKey, eventHubConsumerKeyValue, new[] { AccessRights.Listen }); eventHubPublisherSettings.Authorization.Add(eventHubListenRule); // configure a manage permission on the event hub const string EventHubManageKey = “manage”; var eventHubManageKeyValue = SharedAccessAuthorizationRule.GenerateRandomKey(); var eventHubManageRule = new SharedAccessAuthorizationRule(EventHubManageKey, eventHubManageKeyValue, new[] { AccessRights.Manage, AccessRights.Listen, AccessRights.Send }); eventHubPublisherSettings.Authorization.Add(eventHubManageRule); // update the event hub await namespaceManager.UpdateEventHubAsync(eventHubPublisherSettings); return true; } |
The above snippet created the permissions for the EventHub we just created. If you now go to the management portal, you can see these permissions allocated to your EventHub. We will these permissions later when creating our publisher and consumer. Note that I also create a manage permission rule, we will use this in the next section when configuring our Stream Analytics namespace.
Creating a Publisher
Now that we have EventHub configured; let’s create a client to start sending messages. In our scenario the client will be a VTU (Vehicle Telematics Unit), these are units that are installed in a vehicle and act as a model for connecting and transmitting information via the internet. We will create a simple console application that will serve as an emulator for our VTU.
- Create a new Console application in Visual Studio 2013
- Add the WindowsAzure.ServiceBus NuGet package to the application, at the time of this writing, the version number was 2.4.9.
-
There are multiple ways to connect to an EventHub so we send messages, the simplest way is to use an EventHubClient type. The Client acts as a proxy to the EventHub and expose a set of operations that facilitate easy publishing and consuming of data streams. Creating an EventHub client is very simple:
// Create an event hub client for publishing event streams
var client = EventHubClient.Create(ConfigurationManager.AppSettings[“ehpath”]); // This will automatically pick up SB connection string from app.config
The Create method accepts the EventHub name and searches for a specific ConnectionString in the configuration file for the application, i.e. the Microsoft.ServiceBus.ConnectionString. If it finds this setting, it uses that for connecting to the Service Bus namespace and further operation on the EventHub. The connection string is where we will use the SAS tokens that we created for the EventHub in the previous section. Since the client is going to be a publisher, we update the connection string with the publisher token. Your connections string would look something like this:
<appSettings>
<!– Service Bus particular app settings for messaging connections –>
<add key=”Microsoft.ServiceBus.ConnectionString” value=”Endpoint=sb://<your sb namespace>.servicebus.windows.net/;SharedAccessKeyName=publisher;SharedAccessKey=<your token>” />
</appSettings>
-
Once you have the EventHub client created, we only need to create an EventData type. EventData is a kind of a DTO object that is used across Event Hub for sending and receiving data streams. EventData supports a Stream, the byte array, or object as data types, this generalization actually ties back to the abstract message types exposed by the AMQP protocol. To create our EventData we will use the VehicleStream type we defined earlier.
// Create a vehicle stream to be sent on a recurring interval
var index = new Random().Next(0, Locations.Length – 1);
var location = Locations[index]; // keep changing location, device may move from one city to another
var eventStream = new VehicleStream()
{
TimeStamp = created,
EngineOilLevel = new Random().Next(-50, 125),
FuelGaugeLevel = new Random().Next(0, 100),
TirePressure = new Random().Next(0, 100),
CreatedAt = location,
Id = deviceId,
VTUStatus = Convert.ToBoolean(new Random().Next(0, 1))
};
// get serialized stream
var bytes = Encoding.UTF8.GetBytes(JsonConvert.SerializeObject(eventStream));
var eventData = new EventData(bytes)
{
PartitionKey = deviceId.ToString(CultureInfo.InvariantCulture) // set the partition key to classify partitions by region
};
The last step now is just to send the data stream, we use the SendAsync operation to send the data to our EventHub
| await client.SendAsync(eventData); |
The Console application should start transmitting event streams, I use a Timer for creating a recurring event stream publish.

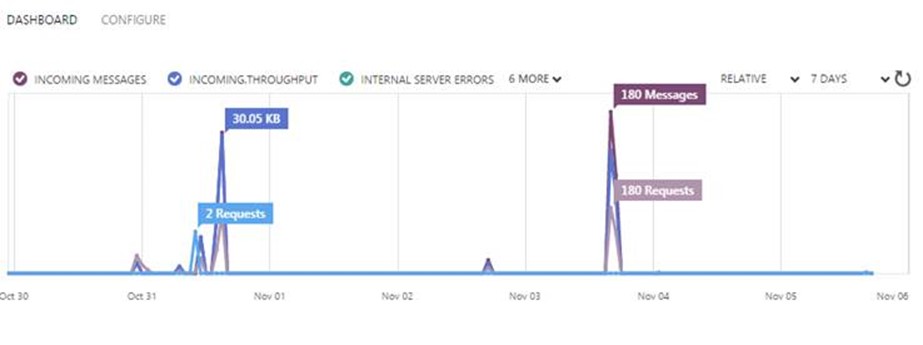
To verify if your data streams are getting published, you can access enable monitoring in the Management Portal and you should see new messages coming in for your EventHub
Testing using a consumer client
Before we start Stream Analytics for consuming event streams, let’s create a quick test client using the EventHub object model and verify if the data is being returned correctly. For creating a Consumer, we will use the EventProcessorHost provided as a supplement to the Service Bus Event Hub.
EventProcessorHost is not part of the WindowsAzure.ServiceBus NuGet package, instead you need to add the Microsoft.Azure.ServiceBus.EventProcessorHost NuGet package. To know more about EventProcessorHost Host refer here:
The first thing to do is to define an EventProcessor. Think of an EventProcessor as an injection of code that will determine how the event stream will be processed when pulled by the consumer. An EventProcessor implements the IEventProcessor interface.
| public class CustomEhProcessor : IEventProcessor |
{
public async Task CloseAsync(PartitionContext context, CloseReason reason)
{
Console.WriteLine(“Custom Processor Shuting Down. Partition ‘{0}’, Reason: ‘{1}’.”, context.Lease.PartitionId, reason);
if (reason == CloseReason.Shutdown)
{
await context.CheckpointAsync();
}
}
public Task OpenAsync(PartitionContext context)
{
Console.WriteLine(“EventProcessor initialize. Partition: ‘{0}’, Offset: ‘{1}'”, context.Lease.PartitionId, context.Lease.Offset);
return Task.FromResult<object>(null);
}
public async Task ProcessEventsAsync(PartitionContext context, IEnumerable<EventData> messages)
{
try
{
foreach (var eventData in messages)
{
// Get the stream
var dataStream = JsonConvert.DeserializeObject<VehicleStream>(Encoding.UTF8.GetString(eventData.GetBytes()));
// get details
var publisherId = dataStream.Id;
var region = eventData.PartitionKey;
Console.WriteLine(“Message received. Partition: ‘{0}’, Device: ‘{1}'”, region, publisherId);
Console.WriteLine(
“FuelGaugeLevel = {0} , OdoMeterReading= {1}, EngineOilLevel = {2} , Location={3}”,
dataStream.FuelGaugeLevel,
dataStream.OdoMeterReading,
dataStream.EngineOilLevel,
dataStream.CreatedAt);
}
// TODO: add check point control for consumers
}
catch (Exception exp)
{
Console.WriteLine(“Error in processing: ” + exp.Message);
}
}
}
Next, we use the EventHubClient and EventProcessorHost and register the custom event processor we created above
| private static async Task ReceiveByPartitionDistributionAsync() |
{
try
{
// Create an event processor host and register the custom processor
var client = EventHubClient.Create(ConfigurationManager.AppSettings[“ehpath”]);
var consumergroupName = client.GetDefaultConsumerGroup().GroupName;
var host = new EventProcessorHost(
“myehhost”,
client.Path,
consumergroupName,
ConfigurationManager.AppSettings[“Microsoft.ServiceBus.ConnectionString”],
ConfigurationManager.AppSettings[“checkpointstore”]);
Console.WriteLine(“Starting Event Processor for {0} consumer group, waiting for incoming messages ….”, consumergroupName);
await host.RegisterEventProcessorAsync<CustomEhProcessor>();
}
catch (Exception ex)
{
Console.WriteLine(ex.Message + ex.StackTrace);
}
finally
{
Console.Read();
}
}
If you now run this in a Console application, the application will start acting as a listener

In the next section, we use Microsoft Stream Analytics to fetch real-time stream data from EventHub. We will the then apply simple query transformations on it to create meaningful reports.
